Writing a blog post: A screencast tutorial

Hey, everyone! In this post I’m going to be including a screencast tutorial that walks you through the process of writing a blog post. If you saw my previous post, it will essentially be all those details demonstrated through a video because it can be confusing to follow along without any direct visuals. That way you can watch the video to get a feel for the process and if you ever want to revisit a brief summary, you can just check out the written post. Hopefully, that will be helpful for those of you starting a blog and confused about how to go about writing posts.

Completing the screencast was pretty tedious considering you had to restart if you ever messed up, which I did. A lot. But the more I did it, the easier it got and the more comfortable I became, especially considering how awkward I felt about having to listen to my voice over and over again. But overall, it was an interesting and enlightening experience because I never thought I would be able to put together a video such as this. If you ever wish to do something similar, definitely check out https://screencast-o-matic.com/ because it’s easy to use and a great way to create a screencast.

Typically, users who are looking for tutorials, tips, or how-to’s on the subject of blogging would be able to find my video based on simple keyword searches. In Wolf’s article, she mentions YouTube’s algorithm which sorts videos based on relevance, and one way for users to find videos is to search by keywords or phrases (2016). For my video, it could be anywhere along the lines of “blogging tips” or “blog post help” or some variation of the sort. YouTube’s algorithm also creates a “filter bubble” which gives customized recommendations to users based on their searches (Wolf, 2016). This could also help users in locating my video if they are searching for blogging tips as it could appear in their suggestions. As Wolf found in her study, users enjoy video tutorials over other sources, such as books, because they like being able to see the entire process and relating to the informant behind the video (2016). For this reason, I believe users will enjoy my video because it provides a visual walkthrough where they are able to see exactly what buttons I click, how I format a post, and what pages to go on, as opposed to reading an article that lists the process with limited visuals that may not be helpful to the user.


Featured Image Source:

Youtube-website-page-layout by JuralMin from https://pixabay.com/en/youtube-website-page-layout-1684601/ (CC0 Creative Commons)

References:

Wolf, Christine T. (2016) “DIY Videos on YouTube: Identity and possibility in the age of algorithms.” First Mondayhttp://firstmonday.org/ojs/index.php/fm/article/view/6787/5517

https://screencast-o-matic.com/

https://www.pexels.com/

https://pixabay.com/

Behind the scenes of a blog post

This post is going to be a quick run-down of the process of writing a blog post. I will be putting up a screencast demonstrating the points in this post shortly, so this will just be a brief overview of what will be covered.

First and foremost, coming up with a title. Try to make it interesting whilst remaining indicative of what the post entails. Clickbait titles may work in your favor, but audiences never appreciate deceit in the long run, so I’d maybe stay away from that. Be witty, make puns, or simply just give readers a reason to click on your post.

flat-2126879_1280
Flat-design-symbol-icon by janjf93 from https://pixabay.com/en/flat-design-symbol-icon-www-2126879/ (CC0 Creative Commons)


Next comes writing. Now, when it comes to writing a post, you want to be yourself. It sounds like common sense, but it’s easy to fall into an artificial version of yourself for the need to impress. People are reading your blog not just because they are interested in the overall theme, but also because they are interested in you and what you have to say! Let them know that you are behind the keyboard and that you are really trying to make a connection. My recommendation is to simply write how you would speak. Keep it conversational and friendly. Be a genuine person. And don’t feel pressured to write a lot! If you only have a little to say, keep it short. If you want to get really in-depth, go for it. Just make sure it’s all relevant and interesting the whole way through by being yourself.

wordpress-923188_1920
WordPress-blogging-writing-typing by StockSnap from https://pixabay.com/en/wordpress-blogging-writing-typing-923188/ (CC0 Creative Commons)

Then we have (my personal favorite part) images. Images make a post more engaging and visually pleasing. They don’t have to be amazing photographs you took yourself. In fact, you can find free-to-use images on websites like Pexels or Pixabay. Pick images that are relevant to your post, especially when it comes to the featured image. And make sure you space out the images throughout the post in a way that makes sense and looks organized. No one wants to look at a bunch of photos and then read a lengthy post at the end of it.

images-381937_1280
Images-photos-photo-collection by Simon from https://pixabay.com/en/images-photos-photo-collection-381937/ (CC0 Creative Commons)

Finally, publishing and sharing your post. When you’re all done, you can publish your post immediately or schedule it for whenever you are ready. There’s a nifty tool under “post settings” on the right-hand side titled “categories & tags.” This basically allows you to put tags on your post that can help you organize your posts on your site as well as connect with other posts of the same category. They sort of act like hashtags similar to Instagram or Twitter. When you go into the “reader” tab on WordPress, you can search tags to find likeminded people or any posts you might be interested in looking at. Go ahead and check out other people’s blogs and they’ll probably check yours out too! Tags are a useful way of connecting with other bloggers and coming together as a community. It can be hard to get your blog out there when you start out, so this is one of the best ways to share your posts with others.

hashtag-1084519_1920
Hashtag-hash-tag-social-internet by TheDigitalArtist from https://pixabay.com/en/hashtag-hash-tag-social-internet-1084519/ (CC0 Creative Commons)

So there you have it, a quick look at what it takes to write a post. If you ever feel hesitant, stop overthinking it and just do. Do, do, do, even if you aren’t 100% satisfied with what you are writing. The more you create, the easier it gets.


Featured Image Source:

List-icon-symbol-paper-sign-flat by Pettycon from https://pixabay.com/en/list-icon-symbol-paper-sign-flat-2389219/ (CC0 Creative Commons)

Creating a Header with Pixlr

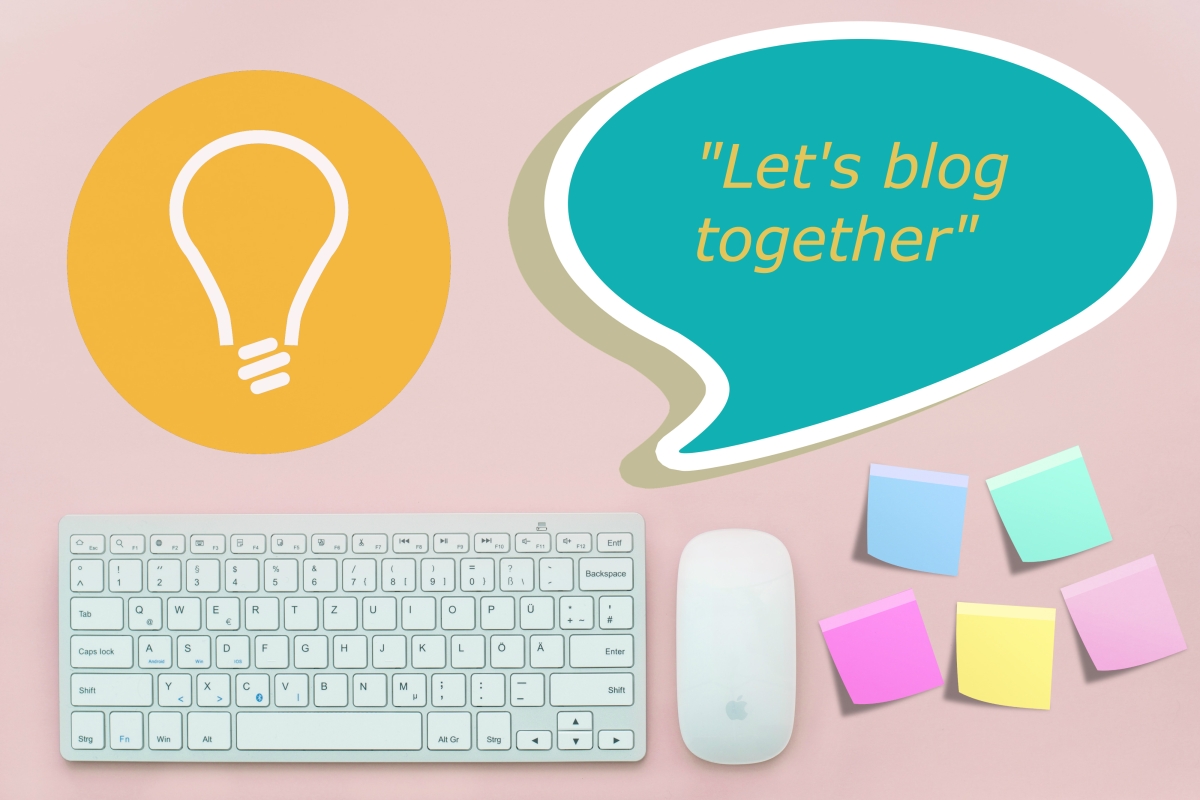
In this post, I’m going to be discussing my experience with Pixlr in my quest to create a header for my site. Now, the theme I chose for my blog does not include a header feature, so supposing I did have a header, the image featured in this post is what you would see. Notice the name of my blog isn’t on there, and that is because I thought it would be redundant to have a header image with the name of my blog right next to the name of my blog on my website, therefore I decided to go with a little tagline.

I’m pretty pleased with how it looks as I think it represents the purpose of my blog very well. It features a keyboard and mouse, the first thing that comes to mind when you hear the term “blogging,” and also the tools necessary for translating thoughts into digital words as well as bringing a vision to life. The sticky notes and the bright, marigold lightbulb represent one’s ideas, whether they’re written down all over the place, or floating around in one’s mind. The speech bubble with the tagline “Let’s blog together” is meant to be me speaking through my own personal blog about the topic I wish to cover. Overall, I feel the header ties together the goal of my website well and lets my audience know what the main elements of blogging include.

stratpres header

All the images I used in the header are from stock photo websites, particularly Pexels and Pixabay. Stock photos are a great way to include visuals into your blog because they are generally free to use, but it’s important to check for any restrictions just in case. The keyboard and mouse photo I used is from Pexels, and it was listed as “free for personal and commercial use” in addition to “no attribution required.” This meant that I could use it for my blog without having to credit anyone, but credit is always appreciated and a harmless practice, therefore I still decided to list the source of the image (at the end of the post). The rest of the images – sticky notes, lightbulb, and speech bubble – are all from Pixabay and under Creative Commons CC0. Just like the Pexels image, these are also free to use and require no attribution, once again allowing me to use them for my blog. Creative Commons CC0 images are also allowed to be edited, which allowed me to play around with colors and such in order to personalize my header to my liking.

In all honesty, I found the production process for the header to be quite difficult and frustrating. As someone who doesn’t really have much experience with photo editing other than the filters and adjustments on Instagram, I found Pixlr to be pretty confusing. I’m not sure if I clicked on certain tools in the wrong order, but I had to restart my header from scratch several times because I could not get certain things to work.

Since this was my first time working with layers to create an image, the idea of each photo being a separate layer was a little confusing to me. But in Manovich’s article, he described layers as “a composite of separate parts” that make up what looks like an “indivisible whole” (2011) which helped me to handle the process of editing each layer. His article also mentioned some useful tools that I might not have noticed, such as the “history window” which kind of acted as an undo for every time I messed up and the “layers menu” where I saw how to mess with opacity or blend mode (Manovich, 2011). Reading the article gave me the courage to play around with the different tools, but I still had a hard time figuring out how they worked, specifically the sponge and smudge tools. All of the tools I ended up using were free transform to size the images, paint bucket to change colors, opacity for a little bit of blending, and mode to change colors as well, even though its meant for blending.

Here’s a little breakdown of the details of my process:

  • 3 layers total, 1 text, 1 background
  • keyboard/mouse/pink – the background image
  • lightbulb – originally gray, but I changed it to a marigold using the paint bucket tool; changed opacity to 75 to make it blend in with the background image more because it was really harsh against it at full opacity; changed size with free transform
  • speech bubble – used free transform tool
  • text – changed color to customized yellow; italicized font
  • sticky notes – changed color using “toggle layers settings” in layers box on the right; switched mode to “hardlight” to get the more pastel look because colors were originally really vibrant; free transform tool

Using Pixlr, or any other photo editing software, is very different from software like MS Paint. For example, MS Paint is a bitmap graphics program, meaning that images created on the application are done so through pixels which results in harsher looking images (Davison, 2015). With a single layer bitmap image, resizing messes with the whole image and each pixel can be noticeable as the image is stretched out. However, with a multiple layer image, you can work with each layer at a time and size them separately in a way that won’t disrupt the entire image as a whole. Bitmap images are also limited in the ways they can be edited since there is only one layer, whereas with a multiple layered image, you can experiment with things such as opacity and blending to add depth to the overall image (Davison, 2015). Through this header creation process, I learned that layers can make an image more interesting and detailed, and with more practice on photo editing software, one can create wonders.


Header image sources:

Desk-flatlay-items-keyboard by Lum3n.com from https://www.pexels.com/photo/desk-flatlay-items-keyboard-399160/ (Pexels License)

Bubble by GraphicsSC from https://pixabay.com/en/bubble-comment-cloud-bubble-thought-2244298/ (CC0 Creative Commons)

Post-it-memos by Alexandra_Koch from https://pixabay.com/en/post-it-memos-notes-info-1975179/ (CC0 Creative Commons)

Lightbulb by OpenClipart-Vectors from https://pixabay.com/en/light-bulb-idea-electric-bulb-151383/ (CC0 Creative Commons)

References:

Davison, Patrick (2015) “Because of the Pixels: On the History, Form, and Influence of MS Paint.” Journal of Visual Culture 13(3). [PDF]

Manovich, Lev (2011) “Inside Photoshop” Computational Culture. http://computationalculture.net/article/inside-photoshop